Interior Painting and Wallpaper Removal
Lynette and Brian were moving into a new home in Columbus, IN and needed almost the entire home re-painted. The previous owners really enjoyed fun bright colors and patterned wallpaper that just wasn’t Lynette and Brian’s style. They preferred a more neutral and sophisticated look, so they decided to reach out to ONiT Painting.
Due to the fact that Lynette and Brian were in the process of closing on the house, they had a very strict timeline. There was only a certain day that they could meet with their realtor to get into the home. Luckily, our President and Commercial Sales Representative, Chris Elliot, was in the Columbus area conducting a commercial estimate that day, so he was able to stop by Lynette and Brian’s to accommodate their schedule.
Chris was able to walk the entire home and speak to the future homeowners about all of the areas they wanted re-painted. There was a main living area, kitchen, bedrooms, and bathrooms. He responded with a detailed estimate, which Lynette and Brian approved, and we were ready to put them on the schedule!
Another aspect of their rigid timeline is that they had a very short window to complete the project. From the time they closed on the home to when their furniture was being moved in was only a few days, so we needed to be able to complete the painting in that timeframe. Luckily, our office coordinator, Luiza Vitucci, scheduled the project as soon as the estimate was approved, and the exact days they needed were open.
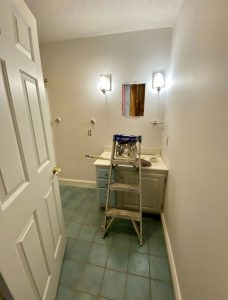
For the most part, the painting in this home was relatively straightforward. There were quite a few drastic color changes, which we’ve covered the process for in Project Spotlight 11: Changing the Color Made All The Difference. However, there was one bathroom that needed wallpaper removal in addition to painting.
Even though it was a small space, the process for wallpaper removal is very involved. Many people think you can simply paint over wallpaper, but this is never a good idea. Painting will bring out all of the textures and seams in the wallpaper, and it is very difficult to get a smooth and uniform finish. Removing wallpaper yourself is most definitely possible, however it can be extremely time consuming, and you must take extra care not to damage the wall.
Due to the fact that Lynette and Brian were in the process of closing on the house, they had a very strict timeline. There was only a certain day that they could meet with their realtor to get into the home. Luckily, our President and Commercial Sales Representative, Chris Elliot, was in the Columbus area conducting a commercial estimate that day, so he was able to stop by Lynette and Brian’s to accommodate their schedule.
Chris was able to walk the entire home and speak to the future homeowners about all of the areas they wanted re-painted. There was a main living area, kitchen, bedrooms, and bathrooms. He responded with a detailed estimate, which Lynette and Brian approved, and we were ready to put them on the schedule!
Another aspect of their rigid timeline is that they had a very short window to complete the project. From the time they closed on the home to when their furniture was being moved in was only a few days, so we needed to be able to complete the painting in that timeframe. Luckily, our office coordinator, Luiza Vitucci, scheduled the project as soon as the estimate was approved, and the exact days they needed were open.
For the most part, the painting in this home was relatively straightforward. There were quite a few drastic color changes, which we’ve covered the process for in Project Spotlight 11: Changing the Color Made All The Difference. However, there was one bathroom that needed wallpaper removal in addition to painting.
Even though it was a small space, the process for wallpaper removal is very involved. Many people think you can simply paint over wallpaper, but this is never a good idea. Painting will bring out all of the textures and seams in the wallpaper, and it is very difficult to get a smooth and uniform finish. Removing wallpaper yourself is most definitely possible, however it can be extremely time consuming, and you must take extra care not to damage the wall.
Tools for Removing Wallpaper:
- 5 in. Rigid Putty Knife
- Wallpaper scoring tool
- Pressure Sprayer
- Hot Water
- Vinegar or Fabric Softener
- Screw Driver
- Safety Goggles
- Plastic Tarp
- Painters Tape
- Garbage Can
- Ladder (Depending on ceiling height)
Steps for removing Wallpaper:
1. Protect your surfaces by laying down a plastic tarp and taping over the electrical outlet. Be sure to turn off the power to that outlet, since this process involves spraying water!
2. Use the wallpaper scoring tool lightly, as to not damage the wall underneath.
3. Spray your hot water solution and begin peeling wallpaper with the putty knife. Work in about 4ft. sections of wall.
4. Remove the painters tape and outlet cover, and use a wet rag to remove wallpaper underneath the outlet.
5. Once all the wallpaper is removed, repeat process with the under-layer of adhesive
It is very important to use an oil based primer before painting a surface where wallpaper has been removed. This type of primer penetrates deeper into the substrate, thus protecting the wall and covering up any stains or discoloration that might have been left behind. For a move in-depth tutorial, check out this HGTV Video on wallpaper removal. In the end, the project turned out wonderfully. Lynette and Brian chose SW7036 Accessible Beige. It did give the home that sophisticated yet neutral look that they were going for. The project went very smoothly and was completed within their timeframe. Lynette and Brian loved their new home, and ONiT was very pleased to have another satisfied customer!
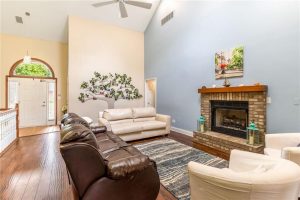
Before ONiT Painting
After ONiT Painting

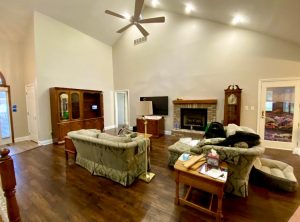
Before ONiT Painting
After ONiT Painting